Begin by downloading and installing the Autoflasher Software and Driver from the provided link HERE.
Section A
Obtaining the TCU Serial Number, Cable Serial Number, and VIN:
- Connect the supplied OBD cable to your truck’s OBD port and the Commander device. Then, connect the provided USB cable from the Commander to your PC.
2a) Open a notepad and enter the following information:
Order number:
Vehicle VIN:
Cable Serial number:
ECM Serial number:
TCM Serial number:
[Only for pre-22 SOTF tunes] Idle choice (stock, rumble, or hiss):
*Ensure to include your read (.bin) files in your email.
2b) Fill in your order number. If you don’t recall your order number, you can locate it in the order confirmation email sent shortly after placing the order.
- Set your ignition to the ON position (not the accessory position).
- Launch the Autoflasher software and navigate to: Cable > Connect.
- Double-click the information listed under Cable S/N (double-clicking will COPY the data) and paste it into the corresponding field in your notepad.
- Within the Autoflasher software, select: OBD > Identify > TCU.
- Double-click the ECU S/N to copy and paste it into the correct field in your notepad.
Note: The number will change upon double-clicking, which is normal, as long as the pasted number starts with “59”.
- Within the Autoflasher software, navigate to OBD > Get VIN. Then, copy and paste the VIN into the appropriate field of your notepad.
- Save a copy of your stock tune by clicking OBD > Read. Select ECM in the pop-up window. Repeat this step if you’re also tuning the TCM, and save the TCM read file accordingly.
- To disconnect, go to Cable > Disconnect in the Autoflasher software.
- If you are dealing with a 2020-2021 ECM, disconnect the Commander device from both your vehicle and PC, and proceed to Section B.
If you’re working on a 2022 ECM, skip ahead to Section C.
Section B
Obtaining the ECM Serial Number from a 2020 or 2021 Model-Year ECM:
Begin with the Commander device disconnected from both the vehicle and PC.
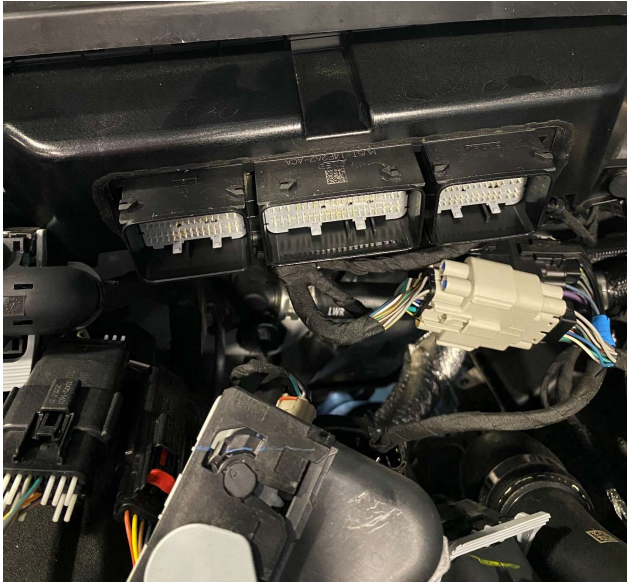
- Begin by opening the hood and locating the ECM. Disconnect all three connectors attached to the ECM.
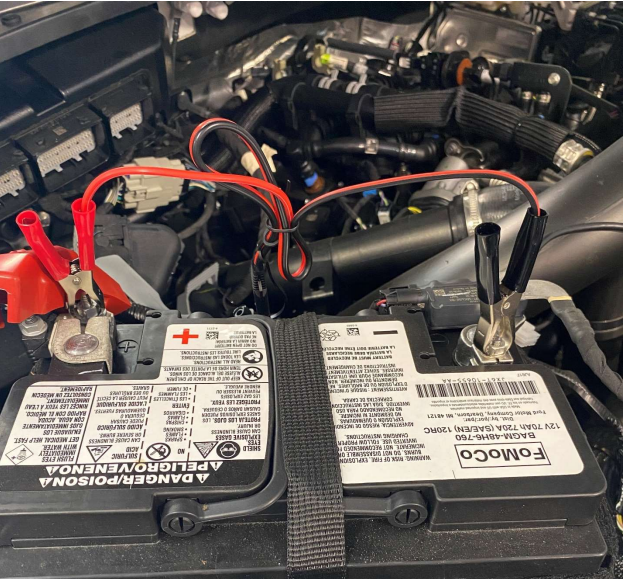
2. Next, attach the provided Battery Harness to the vehicle’s battery, ensuring that the red cable is connected to the positive terminal and the black cable to the negative terminal.
IMPORTANT: Do not connect the Commander Harness to the ECM until all three factory connectors are removed.
- Now, connect the provided ECM connector to the ECM’s connector labeled “Vehicle.” Ensure that the harness fits snugly into place. Then, connect the other end of the harness to the Commander device.
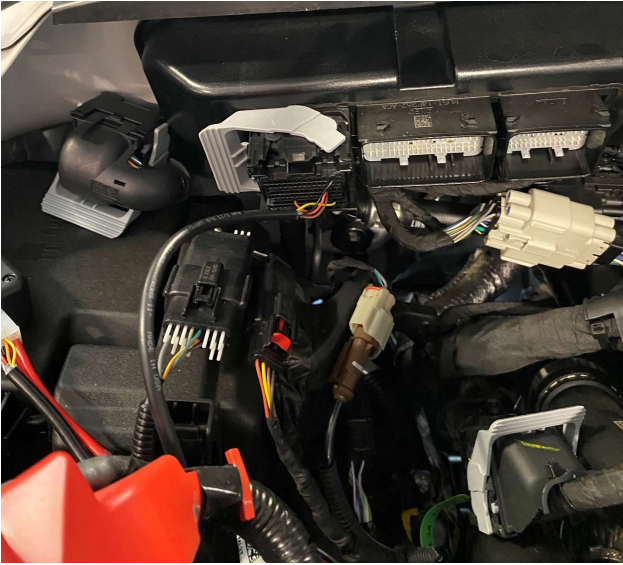
- Connect the provided USB cable to both the Commander device and your PC, then proceed to open the Autoflasher software.
- Within the Autoflasher software, navigate to Service Mode > Identify > ECU.
- Double-click on the ECU S/N. The number will alter upon double-clicking, which is normal. Ensure the copied number begins with “40” and paste it into the designated field of your notepad.
- Select Service Mode > Read in the Autoflasher software. In the subsequent prompt, choose ECU, and then click Enter. Once the read process is complete, save your “.bin” read file.
- To disconnect, click on Cable > Disconnect in the Autoflasher software.
- Finally, detach the Commander device from both your vehicle and PC. Proceed to Section D.
Section C
Getting the ECM serial number from a 2022 model-year ECM:
- Begin by connecting the provided OBD cable to both your truck’s OBD port and the Commander device. Additionally, connect the provided USB cable from the Commander to your PC.
- Turn the ignition to the ON position (not the accessory position).
- Launch the Autoflasher software and navigate to Cable > Connect.
- Within the Autoflasher software, proceed to OBD > Identify > ECU.
- Double-click on the ECU S/N to copy and paste it into the designated field in your notepad. Note that the number will alter when double-clicked; however, it should begin with “37”.
- Next, click on OBD > Read within the Autoflasher software. In the ensuing prompt, select ECU, and then click Enter. Save this “.bin” file for submission.
- To disconnect, click on Cable > Disconnect within the Autoflasher software.
- Finally, disconnect the Commander device from both your vehicle and PC.
Section D
Sending the files for us to create your tune file
Now that all necessary fields are filled, open a new email addressed to info@thedpfdelete.com with the subject “Order number (insert your order number) Powerstroke Tune Request”.
Paste the information from your notepad into the body of the email, attach your read files, and send the email to us.
Please allow 1-3 business days for us to create and send your tune back to you. If you’ve purchased a TCM tune, please note that it will be sent in a separate email due to current email file size restrictions.
Section E
Writing your ECM tune file
- Begin by following the instructions outlined in Section B or C, depending on your truck’s model year, to establish the connection with your vehicle.
- Once connected, proceed by selecting either OBD > Write or Service Mode > Write, depending on the appropriate method for your truck (Service Mode for 2020-2021 models and OBD for 2022+ models). In the new prompt, choose the module you wish to flash (ECU for the engine computer and TCU for the transmission computer). Always start with the ECU if you’ve ordered both ECU and TCU tunes.
- Locate the saved tune file on your computer, select it, and then click Open.
- The writing process typically lasts about 10 minutes.
- After the flashing is complete, you’ll see a message indicating “Flash complete“. Click Cable > Disconnect, then reattach any factory cables you may have removed and take your truck for a drive!
Section F
KAM Reset Procedure – This must be done IMMEDIATELY after loading the tune file
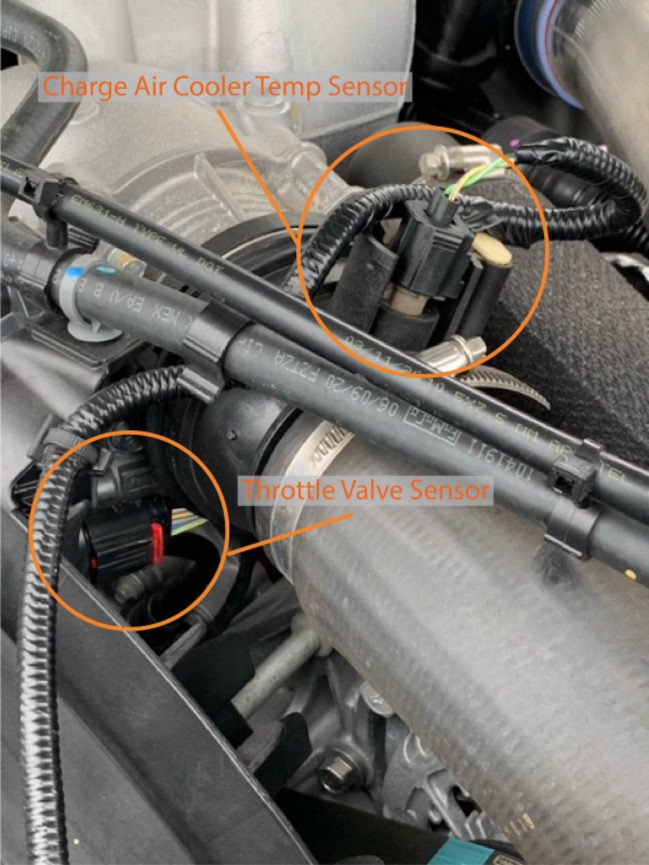
- Ensure that the throttle valve is disconnected (Refer to the image below).

- Initiate the relearn process starting at a 1/4 throttle position. Allow the vehicle to shift through all gears, then pull over, shift to park, turn off the truck, and open/close the driver’s door.
- Repeat the relearn process at 1/2 throttle, 3/4 throttle, and full throttle positions.
- If power isn’t sustained at any throttle position, repeat the previous throttle position’s relearn process.
- Once the relearn process is complete, reconnect the throttle valve if you’re using a single-tune file on a 2022 ECM. If you’re employing SOTF on a 2020-2021 ECM, you can proceed to section G.
Section G
Wiring your SOTF switch (2020-2021 ECM running SOTF)
- Identify a suitable location within the cabin to mount the switch securely.
- Thread the wires through the driver’s side firewall rubber grommet into the engine bay.
- Once in the engine bay, guide the wires towards the front, reaching the Charge Air Cooler (CAC) sensor location.
- Insert the SOTF wires into the provided CAC connector; note that wire orientation is not critical.
- Disconnect the CAC sensor and attach the SOTF connector to the factory CAC harness.
- Unplug the Throttle Valve sensor and carefully tape the connector away from any moving components.